The name UBTAN is extremely familiar to all of us, isn't it !! There is a ritual to apply ubtan to the bridegroom before D-Day. Ubtan helps to revive the natural glow of the skin and works best to remove sun tanning from the skin. Also, we apply ubtan to newborn babies for months. It clarifies skin and brightens up further. Best Ubtan Products for Glowing Skin Being encircled by chemical-loaded skincare products, it is quite tough to accomplish glowing and healthy skin. Our skin deserves a gentle yet effective solution that belongs to the essence of tradition and nature. And here comes natural, herbal, and organic skincare products. It is a challenge to get organic and natural skincare products as the market is flooded with zillions of brands. To maintain that age-old tradition of applying ubtan for glowing skin, I have narrowed down some of the best ubtan products for you to choose from. What is Ubtan - Ubtan is an age-old natural solution discovered by our grannies. It is an he
I am feeling super lazy today.. Don't know why..?? Then thought to share a nail art with you guys which I have drawn 2-3 days before... Spring is already over and hot summer has already started.. But I am in a phase of drawing spring nailarts.. I have a couple of spring nailarts to share.. So here is one of them.. ( Have you seen my first spring inspired nailart,click HERE to see) ..

Daisy flowers are one of those beautiful flowers of spring season.. In my balcony I have also a daisy plant and there are two big flowers .. I wanted to share those,but see , forgot to click.. Anyway I will update the pics here soon..
So now move to the nailart tutorial..
Products Needed:
1- Three nail paints (here i have taken black,white and yellow)
2- A Dotting tool
3- A thin nail brush
4- A base and top coat
Steps:
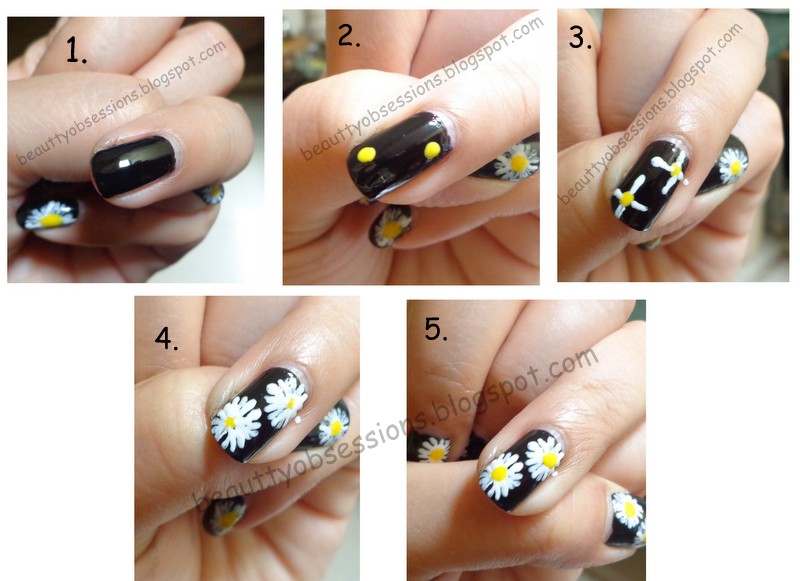
1- First apply a base coat on your nails to prevent from damage .. Then apply a good layer of nail paint which you want to keep as the base colour.. Here I have taken black as the base colour but you can choose and darker shade.
2- Then with the help of a dotting tool put two yellow drops like in the picture.. Here the yellow drop acts like the middle of the flower. Let it be dry a little.

3- Then draw white lines in the form of a plus sign like in the picture with the help of a thin nail brush.. You can opted toothpick instead of brush and dotting tool as well.
4- Then fill the gaps with several lines ..( see the picture) and finally it will look like a flower..
5- Now put a yellow drop in the middle of the flower again to clear the look. Wait to dry completely .. and apply a nice top coat to luck the creation..
Here is the final output...How is it ??


Hope you all like it.. Do share your feed back in comment section.. Bye..

Daisy flowers are one of those beautiful flowers of spring season.. In my balcony I have also a daisy plant and there are two big flowers .. I wanted to share those,but see , forgot to click.. Anyway I will update the pics here soon..
So now move to the nailart tutorial..
Products Needed:
1- Three nail paints (here i have taken black,white and yellow)
2- A Dotting tool
3- A thin nail brush
4- A base and top coat
Steps:
1- First apply a base coat on your nails to prevent from damage .. Then apply a good layer of nail paint which you want to keep as the base colour.. Here I have taken black as the base colour but you can choose and darker shade.
2- Then with the help of a dotting tool put two yellow drops like in the picture.. Here the yellow drop acts like the middle of the flower. Let it be dry a little.
3- Then draw white lines in the form of a plus sign like in the picture with the help of a thin nail brush.. You can opted toothpick instead of brush and dotting tool as well.
4- Then fill the gaps with several lines ..( see the picture) and finally it will look like a flower..
5- Now put a yellow drop in the middle of the flower again to clear the look. Wait to dry completely .. and apply a nice top coat to luck the creation..
Here is the final output...How is it ??


Hope you all like it.. Do share your feed back in comment section.. Bye..
Simple and very cute nail art.
ReplyDeleteThank you dear.. Do try...
DeleteVery nice and interesting post here. I like it. Thanks for sharing.
ReplyDeleteYou are welcome.. Glad you liked it..
Deletepretty spring nail art
ReplyDeleteThis is so easy and looks super pretty..going to try it soon :)
ReplyDeleteYaa it is so easy to art.. Sure do try.. thank you
Deletevery pretty and easy to try. Loved the colour choice too
ReplyDeleteThanx a lot megha...
DeleteThis is super cute!
ReplyDeleteSuch a cute mani hun :) x
ReplyDeleteSuperb !! Loved the tutorial also
ReplyDeleteThank you Anita.. I am super glad that you liked my tutorial...
DeleteVery cute nail art :)
ReplyDeleteThanx hun...
DeleteLove it - very cute and springy :) x
ReplyDeleteThanx doll... :)
DeleteLovely nail art!! Daisy looks superb!
ReplyDeleteThanx kanu...
DeleteIt's so pretty and scream summer. Loved it.
ReplyDeleteRegards,
Dr. Farhat Sultana
www.indianbeautynetwork.com
its so beautyfull
ReplyDeletefashion news